
Pengaturan BIOS
CATATAN: Layar BIOS pada bab ini hanya ditujukan sebagai referensi. Layar
sebenarnya dapat berbeda menurut model dan kawasan.
Boot
Menu ini memungkinkan Anda menetapkan prioritas opsi boot. Anda dapat
melihat prosedur berikut saat menetapkan prioritas boot.
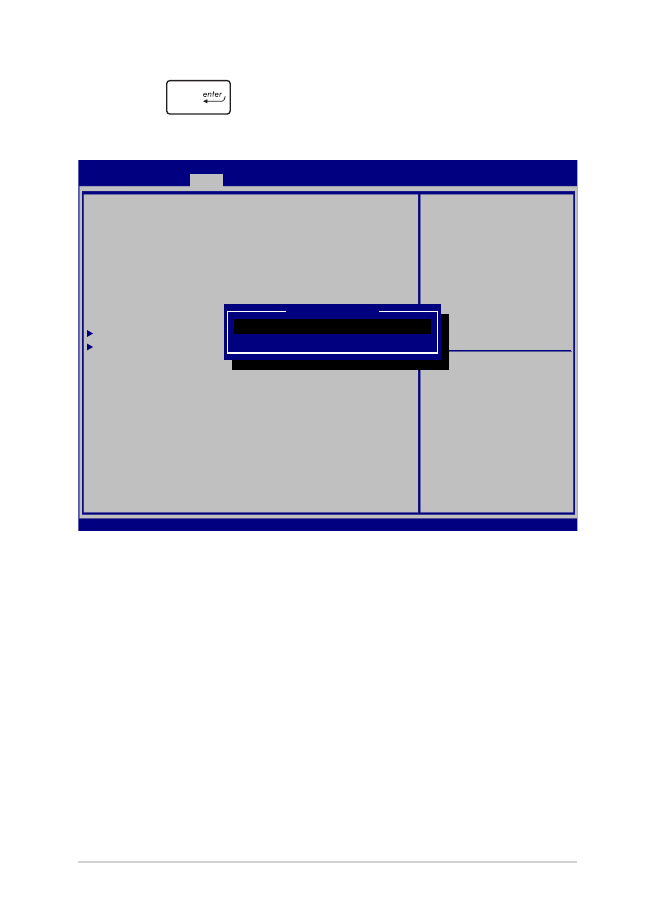
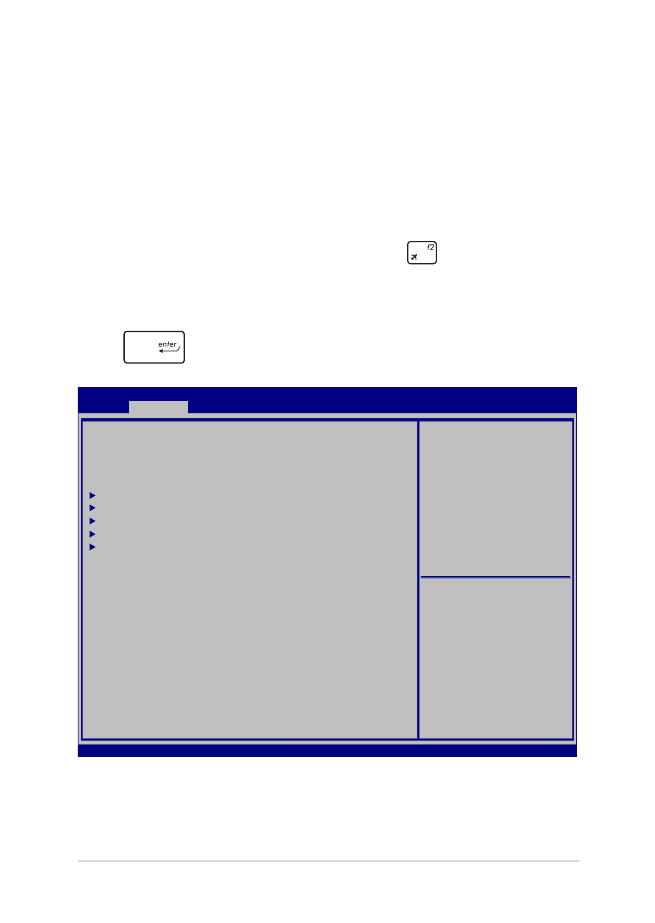
1.
Pada layar Boot, pilih Boot Option #1 (Pilihan Boot #1).
Aptio Setup Utility - Copyright (C) 2015 American Megatrends, Inc.
Main Advanced
Boot
Security Save & Exit
Version 2.16.1243 Copyright (C) 2015 American Megatrends, Inc.
Boot Configuration
Fast Boot [Enabled]
Launch CSM [Disabled]
Driver Option Priorities
Boot Option Priorities
Boot Option #1 [Windows Boot Manager]
Add New Boot Option
Delete Boot Option
Sets the system boot
order
→
← : Select Screen
↑↓ : Select Item
Enter: Select
+/— : Change Opt.
F1 : General Help
F9 : Optimized Defaults
F10 : Save & Exit
ESC : Exit
62
Panduan Pengguna Elektronik PC Notebook
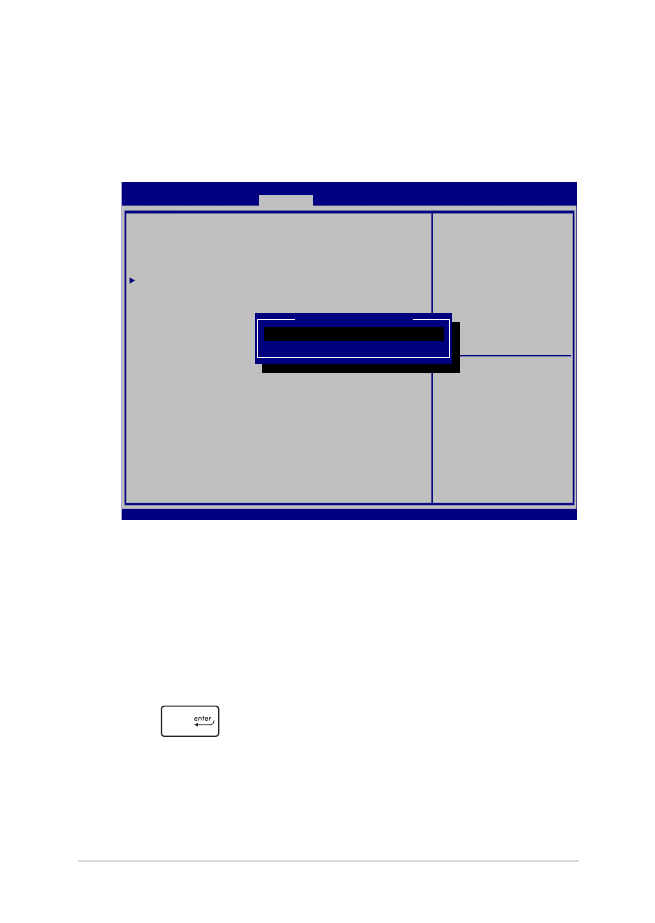
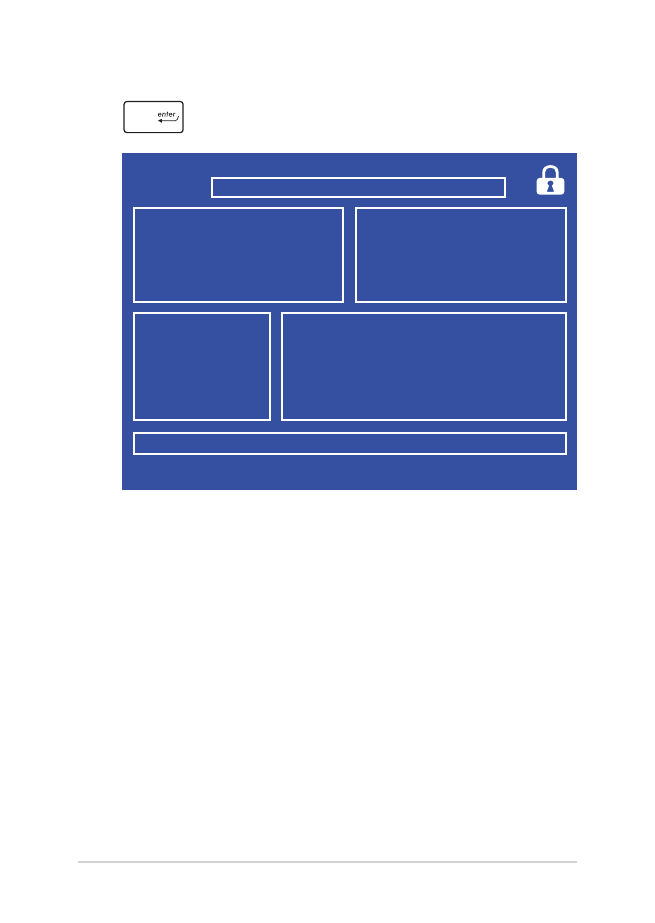
2.
Tekan
lalu pilih perangkat sebagai Boot Option #1
(Pilihan Boot #1).
Aptio Setup Utility - Copyright (C) 2015 American Megatrends, Inc.
Main Advanced
Boot
Security Save & Exit
Version 2.16.1243 Copyright (C) 2015 American Megatrends, Inc.
Boot Configuration
Fast Boot [Enabled]
Launch CSM [Disabled]
Driver Option Priorities
Boot Option Priorities
Boot Option #1 [Windows Boot Manager]
Add New Boot Option
Delete Boot Option
Sets the system boot
order
→
← : Select Screen
↑↓ : Select Item
Enter: Select
+/— : Change Opt.
F1 : General Help
F9 : Optimized Defaults
F10 : Save & Exit
ESC : Exit
Boot Option #1
Windows Boot Manager
Disabled

Panduan Pengguna Elektronik PC Notebook
63
Keamanan
Menu ini memungkinkan Anda mengonfigurasikan administrator dan
sandi pengguna PC Notebook. Menu tersebut juga memungkinkan
Anda mengontrol akses ke drive hard disk PC Notebook, interface
input/output (I/O), dan interface USB.
CATATAN:
•
Jika Anda menginstal User Password (Sandi Pengguna), Anda akan
diminta memasukkannya sebelum memasukkan sistem operasi PC
Notebook.
•
Jika Anda menginstal Administrator Password (Sandi
Administrator), Anda akan diminta memasukkannya sebelum
memasukkan BIOS.
Aptio Setup Utility - Copyright (C) 2015 American Megatrends, Inc.
Main Advanced Boot
Security
Save & Exit
Version 2.16.1243 Copyright (C) 2015 American Megatrends, Inc.
Password Description
If ONLY the Administrator’s password is set, then
this only limits access to Setup and is only asked
for when entering Setup. If ONLY the user’s password
is set, then this is a power on password and must be
entered to boot or enter Setup. In Setup, the User
will have Administrator rights.
Administrator Password Status NOT INSTALLED
User Password Status NOT INSTALLED
Administrator Password
User Password
HDD Password Status : NOT INSTALLED
Set Master Password
Set User Password
I/O Interface Security
System Mode state User
Secure Boot state Enabled
Secure Boot Control [Enabled]
Key Management
Set Administrator
Password. The password
length must be in the
following range:
Minimum length 3
Maximum length 20
Must type with character:
a-z, 0-9
→
← : Select Screen
↑↓ : Select Item
Enter: Select
+/— : Change Opt.
F1 : General Help
F9 : Optimized Defaults
F10 : Save & Exit
ESC : Exit

64
Panduan Pengguna Elektronik PC Notebook
Untuk menetapkan sandi:
1.
Pada layar Security (Keamanan), pilih Setup Administrator
Password (Buat Sandi Administrator) atau User Password
(Sandi Pengguna).
2.
Masukkan sandi, lalu tekan
.
3.
Masukkan kembali untuk mengkonfirmasikan sandi, lalu tekan
.
Untuk menetapkan sandi:
1.
Pada layar Security (Keamanan), pilih Setup Administrator
Password (Buat Sandi Administrator) atau User Password
(Sandi Pengguna).
2.
Masukkan sandi, lalu tekan
.
3.
Masukkan kembali untuk mengkonfirmasikan sandi, lalu
tekan
.
4.
Pilih Yes (Ya) dalam kotak konfirmasi lalu tekan
.
Panduan Pengguna Elektronik PC Notebook
65
Keamanan Interface I/O
Pada menu Keamanan, Anda dapat mengakses Keamanan
Interface I/O untuk mengunci atau membuka kunci fungsi
interface PC Notebook.
Untuk menghapus sandi:
1.
Pada layar Security (Keamanan), pilih Setup
Administrator Password (Buat Sandi Administrator) atau
User Password (Sandi Pengguna).
2.
Masukkan sandi yang sedang digunakan, lalu tekan
.
3.
Pilih Lock (Kunci).
Aptio Setup Utility - Copyright (C) 2015 American Megatrends, Inc.
Main Advanced Boot
Security
Save & Exit
Version 2.16.1243 Copyright (C) 2015 American Megatrends, Inc.
I/O Interface Security
LAN Network Interface [UnLock]
Wireless Network Interface [UnLock]
HD AUDIO Interface [UnLock]
USB Interface Security
If Locked, LAN controller
will be disabled.
→
← : Select Screen
↑↓ : Select Item
Enter: Select
+/— : Change Opt.
F1 : General Help
F9 : Optimized Defaults
F10 : Save & Exit
ESC : Exit
LAN Network interface
Lock
UnLock
66
Panduan Pengguna Elektronik PC Notebook
Keamanan Interface USB
Melalui menu Keamanan Interface I/O, Anda juga dapat
mengakses Keamanan Interface USB untuk mengunci atau
membuka port kunci dan perangkat.
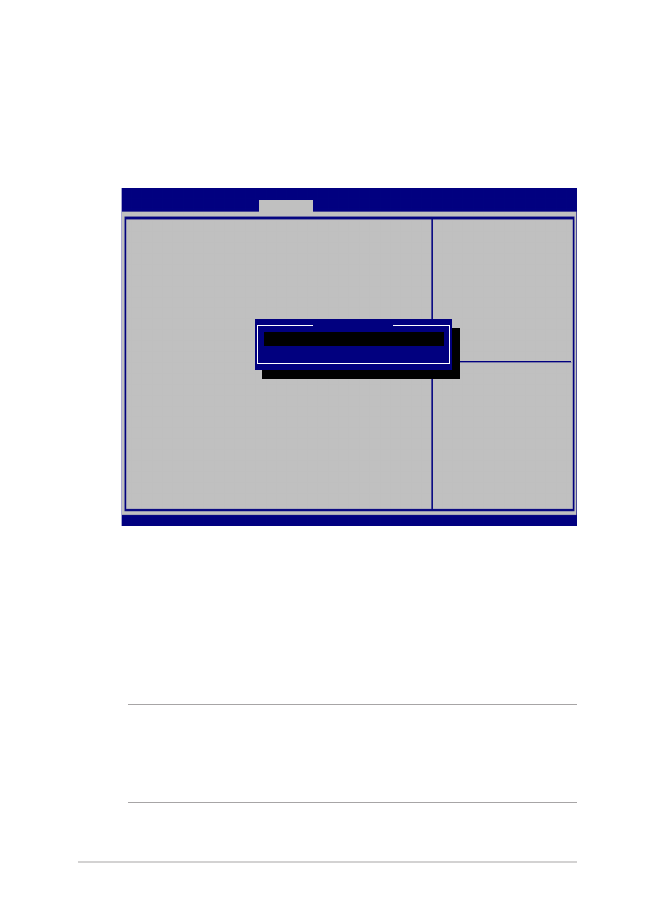
Untuk mengunci interface USB:
1.
Pada layar Security (Keamanan), pilih /O Interface
Security (Keamanan Interface I/O) > USB Interface
Security (Keamanan Interface USB).
2.
Pilih interface yang akan dikunci, lalu klik Lock (Kunci).
CATATAN: Mengatur USB Interface (Interface USB) untuk Lock (kunci)
juga mengunci dan menyembunyikan External Port (Port Eksternal)
dan perangkat lainnya yang tercakup pada USB Interface Security
(Keamanan Interface USB).
Aptio Setup Utility - Copyright (C) 2015 American Megatrends, Inc.
Main Advanced Boot
Security
Save & Exit
Version 2.16.1243 Copyright (C) 2015 American Megatrends, Inc.
USB Interface Security
USB Interface [UnLock]
External Ports [UnLock]
CMOS Camera [UnLock]
Card Reader [UnLock]
If Locked, all USB device
will be disabled
→
← : Select Screen
↑↓ : Select Item
Enter: Select
+/— : Change Opt.
F1 : General Help
F9 : Optimized Defaults
F10 : Save & Exit
ESC : Exit
USB interface
Lock
UnLock
Panduan Pengguna Elektronik PC Notebook
67
Membuat Sandi Utama
Pada menu keamanan, Anda dapat menggunakan Set Master
Password(Buat Sandi Utama) untuk mengonfigurasi akses
dengan sandi aktif pada drive hard disk.
Untuk membuat sandi HDD:
1.
Pada layar Security (Keamanan), klik Set Master Password
(Buat Sandi Master).
2.
Masukkan sandi, lalu tekan
.
3.
Masukkan kembali sandi untuk mengkonfirmasi, lalu tekan
.
4.
Klik Set User Password (Buat Sandi Pengguna), lalu ulangi
langkah sebelumnya untuk membuat sandi pengguna.
Aptio Setup Utility - Copyright (C) 2015 American Megatrends, Inc.
Main Advanced Boot
Security
Save & Exit
Version 2.16.1243 Copyright (C) 2015 American Megatrends, Inc.
Password Description
If ONLY the Administrator’s password is set, then
this only limits access to Setup and is only asked
for when entering Setup. If ONLY the user’s password
is set, then this is a power on password and must be
entered to boot or enter Setup. In Setup, the User
will have Administrator rights.
Administrator Password Status NOT INSTALLED
User Password Status NOT INSTALLED
Administrator Password
User Password
HDD Password Status : NOT INSTALLED
Set Master Password
Set User Password
I/O Interface Security
Set HDD Master Password.
***Advisable to
Power Cycle System
after Setting Hard
Disk Passwords***
→
← : Select Screen
↑↓ : Select Item
Enter: Select
+/— : Change Opt.
F1 : General Help
F9 : Optimized Defaults
F10 : Save & Exit
ESC : Exit

68
Panduan Pengguna Elektronik PC Notebook
Simpan dan Keluar
Untuk menjaga pengaturan konfigurasi, pilih Save Changes and Exit
(Simpan Perubahan dan Keluar) sebelum keluar dari BIOS.
Aptio Setup Utility - Copyright (C) 2015 American Megatrends, Inc.
Main Advanced Boot Security
Save & Exit
Version 2.16.1243 Copyright (C) 2015 American Megatrends, Inc.
Save Changes and Exit
Discard Changes and Exit
Save Options
Save Changes
Discard Changes
Restore Defaults
Boot Override
Windows Boot Manager
Launch EFI Shell from filesystem device
Exit system setup after
saving the changes.
→
← : Select Screen
↑↓ : Select Item
Enter: Select
+/— : Change Opt.
F1 : General Help
F9 : Optimized Defaults
F10 : Save & Exit
ESC : Exit
Panduan Pengguna Elektronik PC Notebook
69
Meng-update BIOS:
1.
Verifikasikan model persis lalu downnload file BIOS terbaru untuk
model Anda dari situs web ASUS.
2.
Simpan salinan file BIOS yang didownload ke drive flash disk.
3.
Sambungkan drive flash disk ke PC Notebook.
4.
Hidupkan ulang PC Notebook lalu tekan
selama POST.
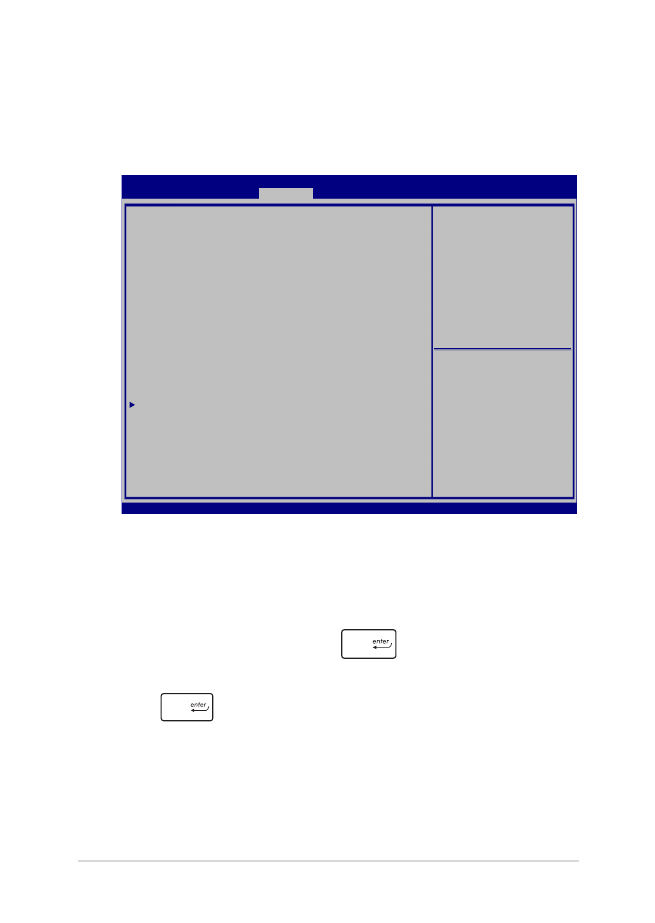
5.
Dari program BIOS Setup (Konfigurasi BIOS), klik Advanced
> Start Easy Flash (Lanjutan > Mulai Easy Flash), lalu tekan
.
Aptio Setup Utility - Copyright (C) 2015 American Megatrends, Inc.
Main
Advanced
Boot Security Save & Exit
Version 2.16.1243 Copyright (C) 2015 American Megatrends, Inc.
Start Easy Flash
Internal Pointing Device [Enabled]
Wake on Lid Open [Enabled]
Power Off Energy Saving [Enabled]
SATA Configuration
Graphics Configuration
Intel (R) Anti-Theft Technology Corporation
USB Configuration
Network Stack
Press Enter to run the
utility to select and
update BIOS.
→
← : Select Screen
↑↓ : Select Item
Enter: Select
+/— : Change Opt.
F1 : General Help
F9 : Optimized Defaults
F10 : Save & Exit
ESC : Exit
70
Panduan Pengguna Elektronik PC Notebook
6.
Cari file BIOS yang didownload dalam drive flash disk lalu tekan
.
7.
Setelah proses pembaruan BIOS, klik Exit > Restore Defaults
(Keluar > Kembalikan Default) untuk mengembalikan sistem ke
pengaturan default.
FSO
FS1
FS2
FS3
FS4
0 EFI
<DIR>
[←→] : Switch [↑↓] : Choose [q] : Exit [Enter] : Enter/Execute
Current BIOS
Platform : GL502
Version : 101
Build Date : Oct 26 2015
Build Time : 11:51:05
New BIOS
FLASH TYPE : Generic Flash Type
ASUSTek EasyFlash Utility
Platform : Unknown
Version : Unknown
Build Date : Unknown
Build Time : Unknown

Panduan Pengguna Elektronik PC Notebook
71